
August 15, 2025
Balsamiq vs Frame0
Balsamiq vs Frame0: Which Low-Fidelity Wireframing Tool is Right for You?
This comprehensive guide provides a step-by-step tutorial on creating user flow diagrams in UX design, including definitions, best practices, tools, examples, and tips to avoid common mistakes.
User flow diagrams are essential tools in UX design, helping to visualize the path a user takes through an app, website, or product to achieve a specific goal. They map out every step, decision point, and potential branch, ensuring a seamless experience that aligns with both user needs and business objectives. Whether you’re a designer, product manager, or developer, mastering user flows can significantly improve your project’s usability and conversion rates. In this guide, we’ll walk through the process step by step, drawing from best practices to help you create effective diagrams.
A user flow diagram illustrates the sequence of actions a user performs to complete a task. It’s different from a wireframe (which focuses on layout) or a sitemap (which shows page hierarchy). Instead, it emphasizes the logical progression, including entry points, interactions, and endpoints. For instance, in an e-commerce app, a user flow might detail the steps from landing on the homepage to completing a purchase, including branches for scenarios like abandoned carts or password resets.
These diagrams are crucial because they highlight pain points early, foster team alignment, and ensure the design supports real user behaviors. Studies show that well-optimized user flows can boost engagement and reduce drop-off rates by up to 50% in digital products.
Creating a user flow doesn’t require advanced skills—just a clear understanding of your users and some basic diagramming tools. Here’s how to do it:
Start by defining who your user is. Create personas based on research: demographics, motivations, pain points, and behaviors. What is their primary goal? For example, if it’s signing up for a newsletter, consider their context— are they a first-time visitor or a returning user?
Align this with business objectives. Ask: How does this flow support conversions, retention, or revenue? This step ensures the diagram isn’t just user-centric but also strategically sound.
Determine where the user starts. This could be a homepage, a marketing email link, a social media ad, or a search result. Multiple entry points? Map them all to cover edge cases. For apps, consider deep links or notifications as starting points.
Brainstorm the sequence of actions. Use a mind map or simple list first: What does the user do next? Include screens, buttons, forms, and interactions. For each step, note:
Keep it linear at first, then add complexity. Tools like sticky notes or digital whiteboards help here.
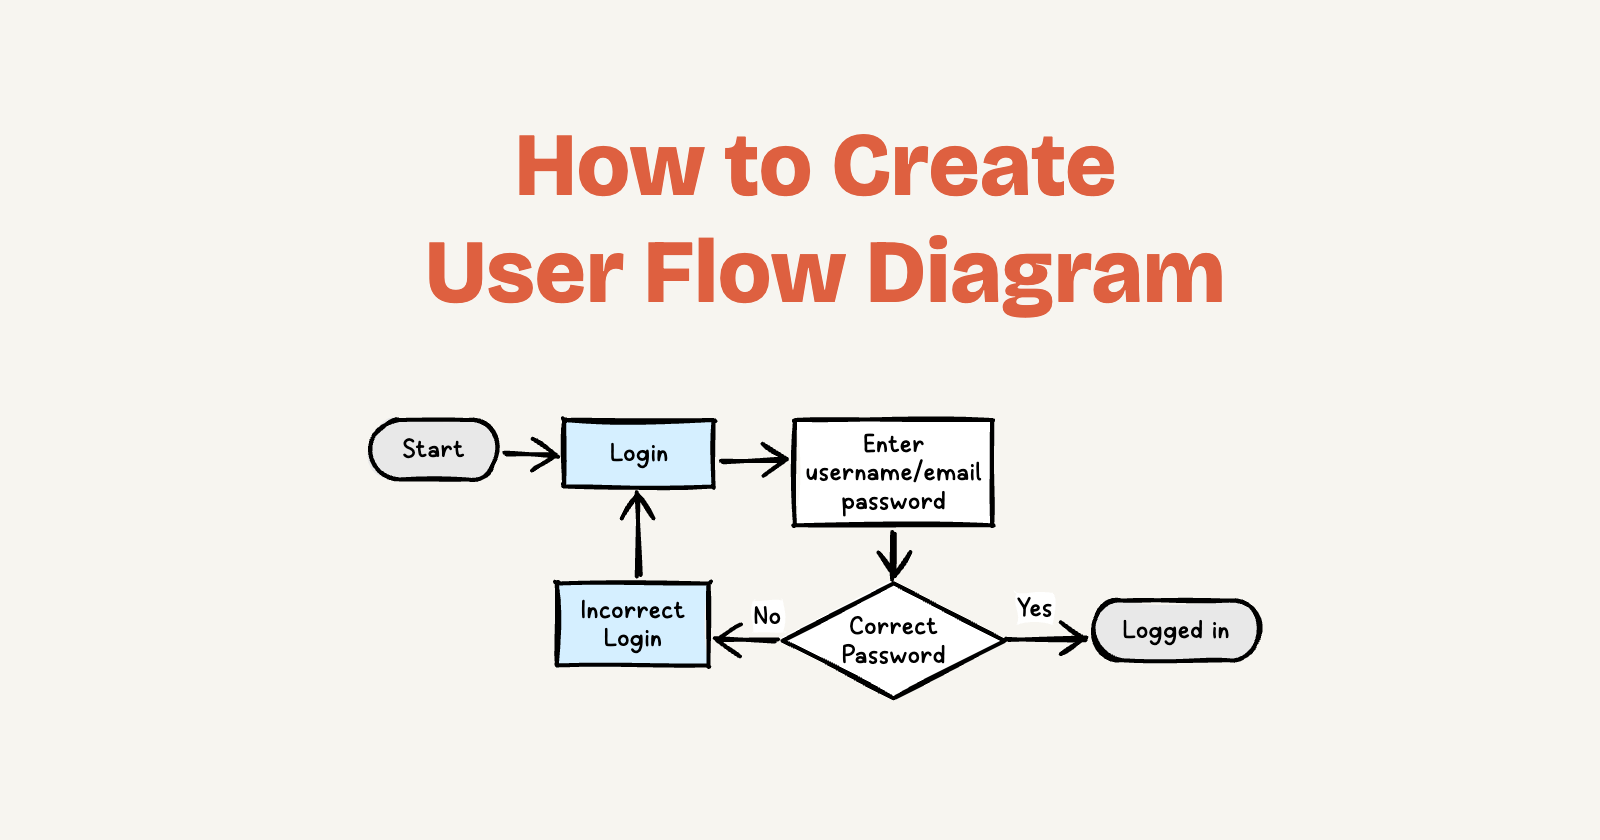
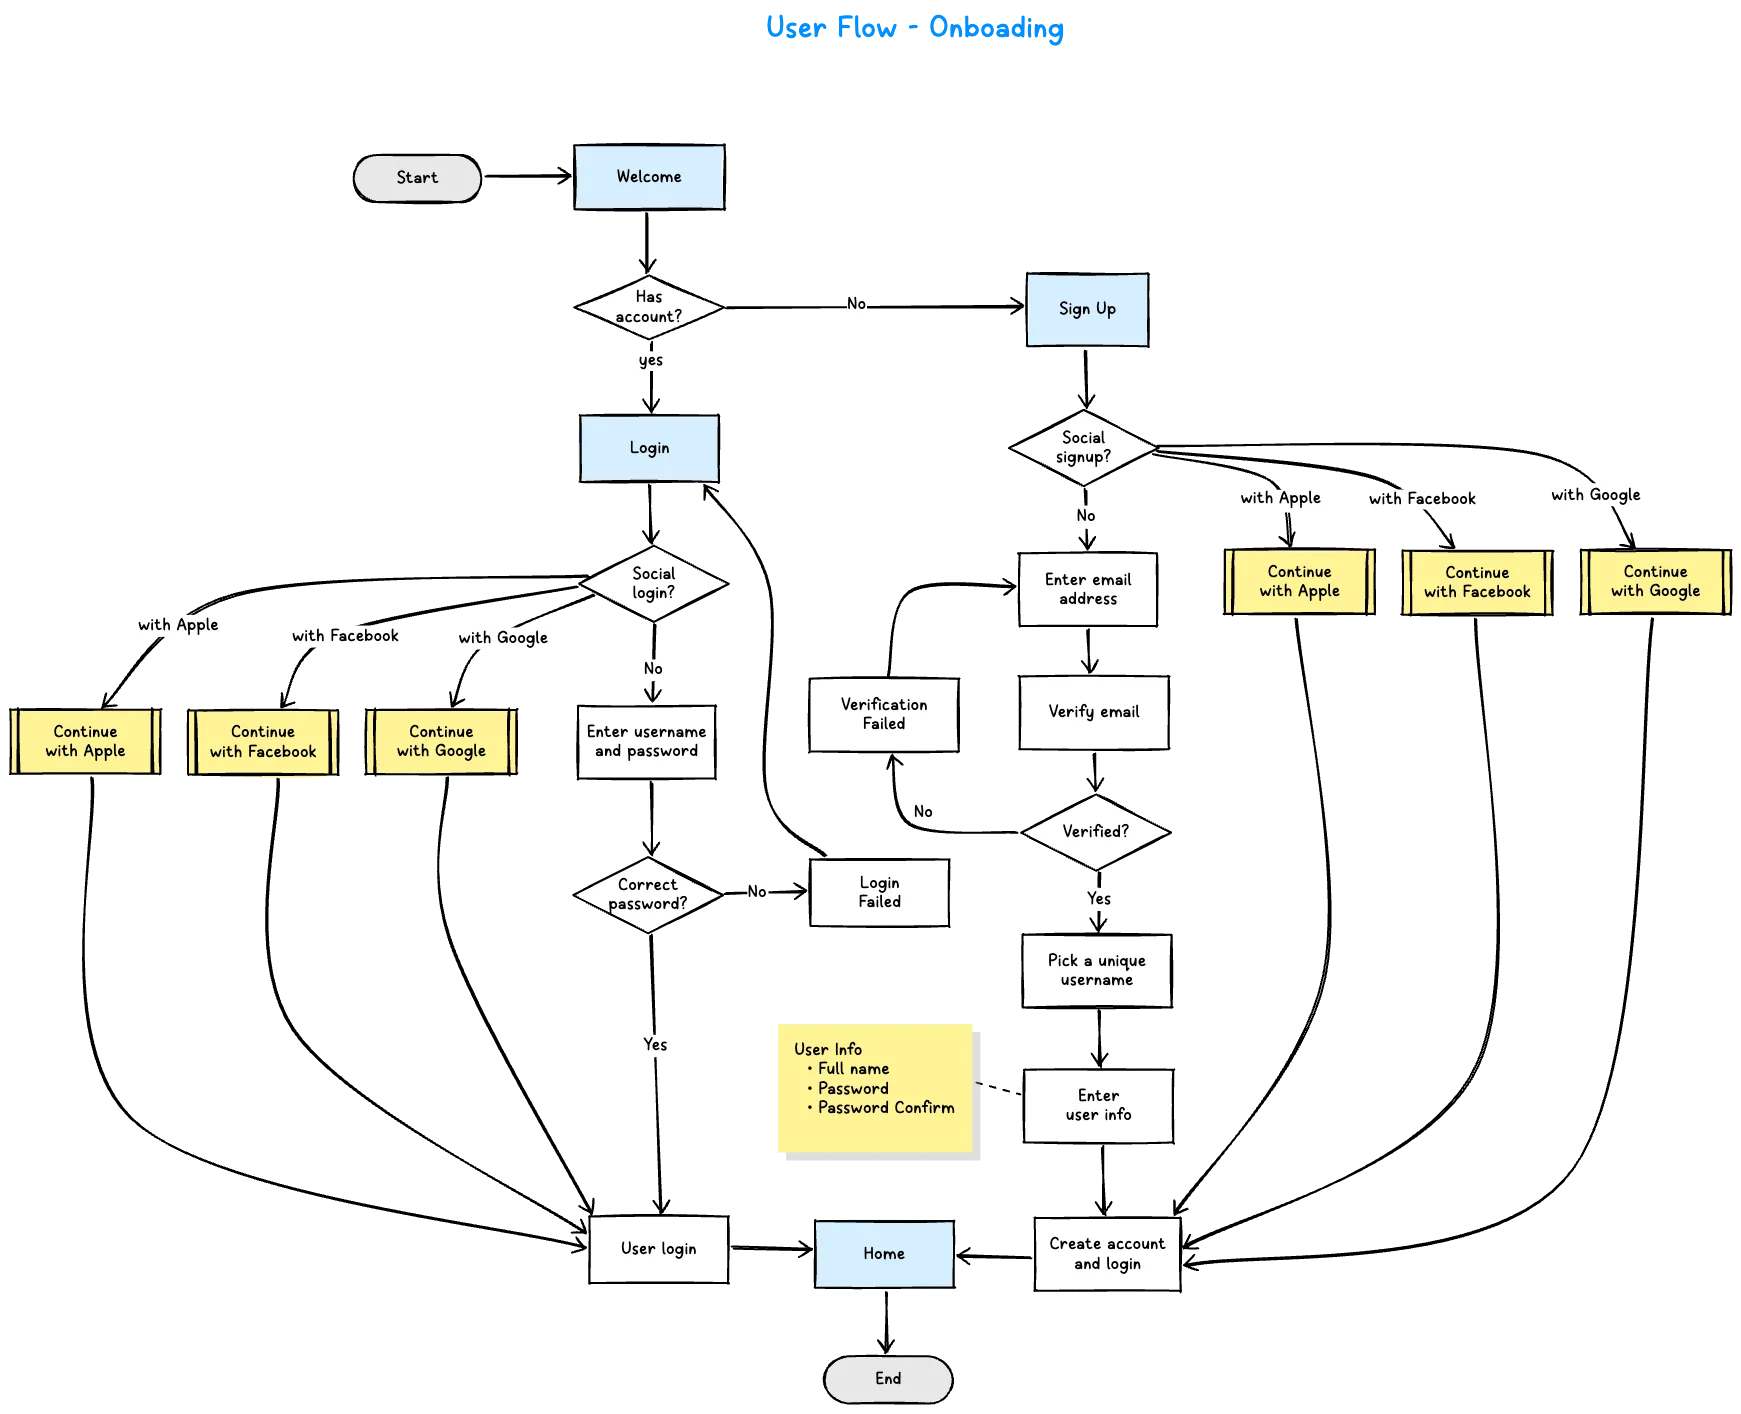
Add diamonds or shapes for decisions (e.g., “Account exists?”) and arrows for flows. Ensure every path leads to an endpoint: success (goal achieved), failure (error page), or exit (user leaves). This prevents dead ends and reveals optimization opportunities.
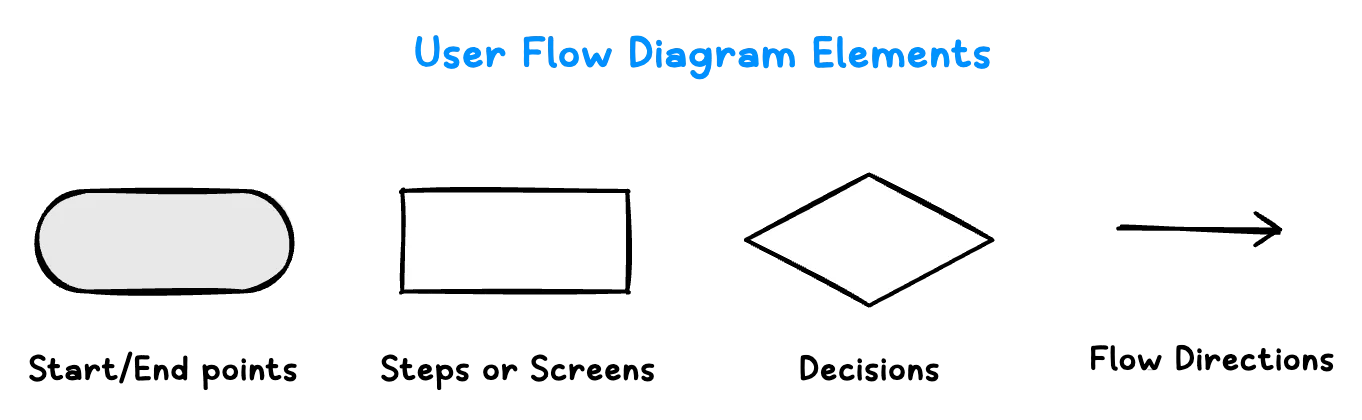
Now, turn your outline into a visual diagram. Use standard shapes:
Iterate based on feedback. Test with real users or stakeholders to validate assumptions. Simplify complex flows by breaking them into sub-flows (e.g., separate diagrams for signup vs. checkout).
You don’t need fancy software—start with pen and paper. For digital versions, try:
For video tutorials, check out YouTube for hands-on examples.
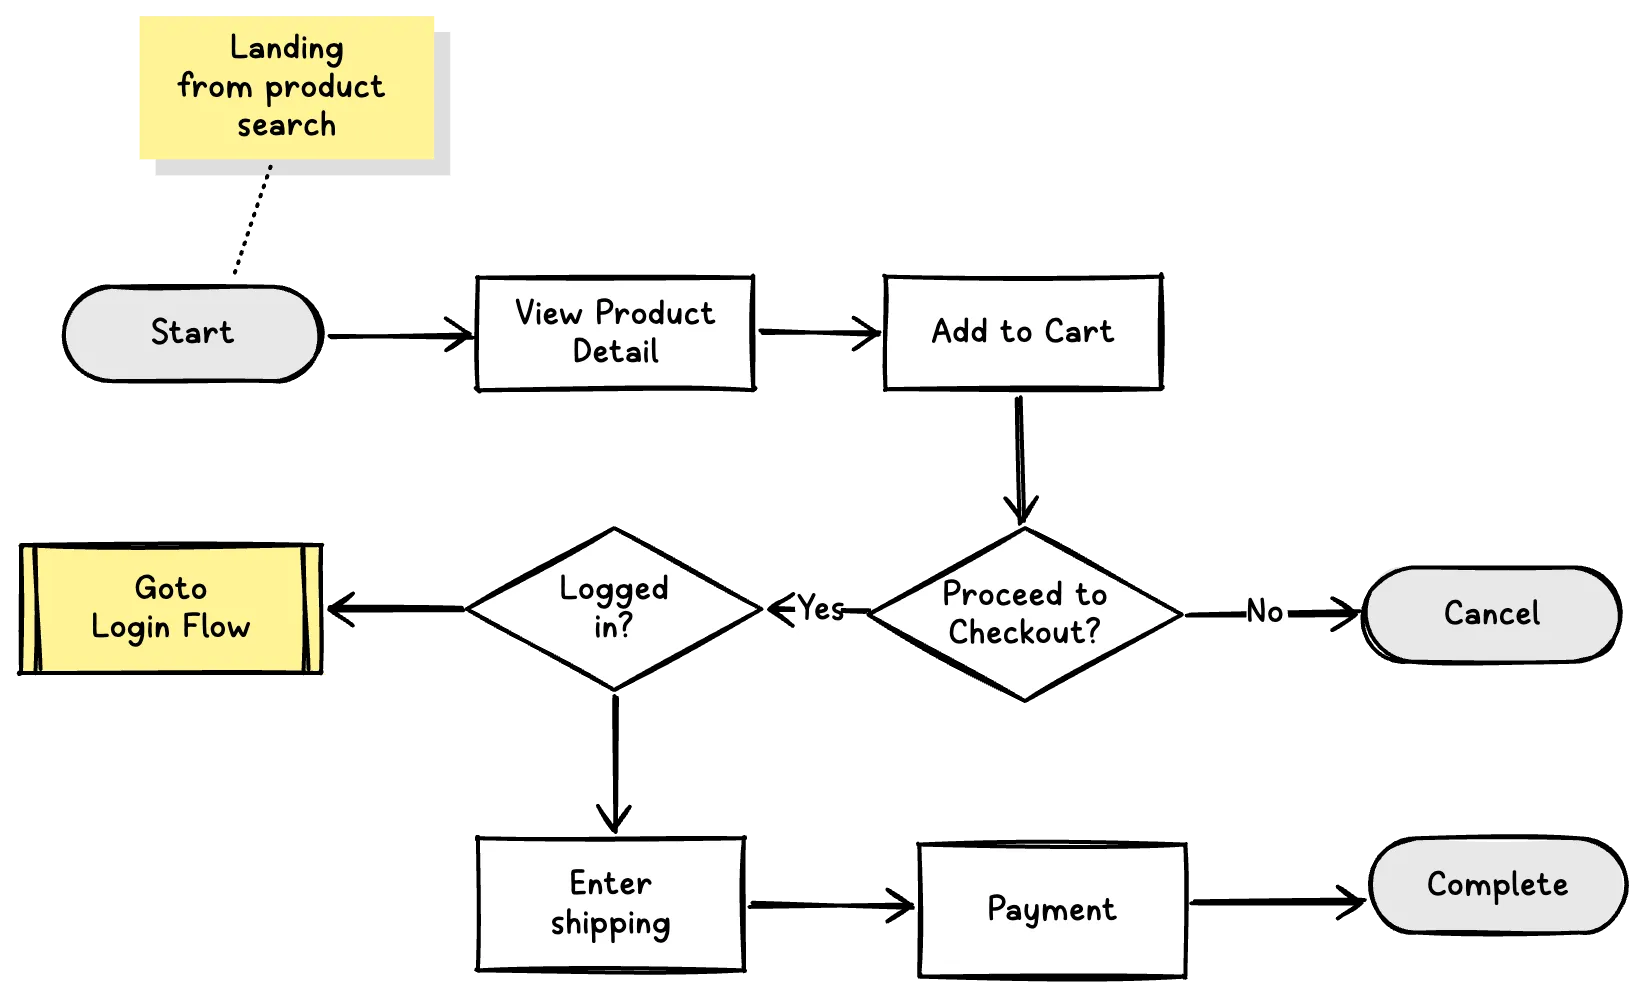
Imagine a simple flow for buying a product:
This diagram would use arrows to show loops, like returning to cart if payment fails.
Creating a user flow diagram is a straightforward yet powerful way to enhance UX and streamline development. By following these steps, you’ll build intuitive experiences that delight users and drive results. Start small with your next project, and iterate as you go. If you’re new to this, experiment with free tools and templates to get hands-on practice. Happy diagramming!

Written in by Minkyu Lee, PhD
Share this article:
August 15, 2025
Balsamiq vs Frame0: Which Low-Fidelity Wireframing Tool is Right for You?
August 26, 2025
Discover why low-fidelity wireframes aren't obsolete in the AI age but are actually more crucial than ever, acting as the perfect blueprint for your app's core ideas and supercharging AI tools for stunning designs and efficient code.

August 15, 2025
Best Free Wireframing Tools in 2025: A Comprehensive Guide